Reference material for king pin to ball joint conversion
I'm going to put links and info here that pertains to the ball joint conversions. It won't be in any particular order.
Do your own "due diligence"!! You are responsible for verifying any of this info before installation. I'm providing this info as a guide and to point you in the right direction. It's not meant to be a comprehensive, step by step instruction. If you're unsure or don't understand how to do any of this, seek professional help. Do not email me about which bearings to use. If you can't figure out which bearings to use, you should not be doing this conversion.
Do your own "due diligence"!! You are responsible for verifying any of this info before installation. I'm providing this info as a guide and to point you in the right direction. It's not meant to be a comprehensive, step by step instruction. If you're unsure or don't understand how to do any of this, seek professional help. Do not email me about which bearings to use. If you can't figure out which bearings to use, you should not be doing this conversion.
Final walk through video
Spindle Assembly
This conversion is designed around the Nissan Hardbody(D21) spindle. The best spindles are between 12/85(720 model) and 1997. The prior year spindles can be used, just not preferred. The 620 spindle used non-vented rotors. The 720 models used a rotor with a shorter top hat which limits wheel choices due to caliper clearance. Any of the disc brake hubs, 620/720/HB, can be used on the HB spindle(or dropped spindle) with the HB rotor/caliper. The preference is to use HB rotors since the offset allows stock 14" steel rims to be used(NOTE: check the info further down about the hubs). If you want the easiest, least expensive option, just obtain the entire HB spindle assembly. Disconnect the two ball joints, the tie rod and brake hose. Remove it all as one unit.
If you want a lower ride height, now would be the time to buy dropped spindles. All the dropped spindles that I've see are HB spindles. If they're getting put on a 720, there are two spacers to offset the caliper to work with the 720 rotor. Just change to an HB rotor and skip the spacers. Here's a link I got from a post made by Steve F. (Redeye) on Ratsun.net. It's Belltech's installation instructions. Take note of item 19.
http://www.belltech.com/extras/docs/BBGC/2010.pdf
If you're looking to run the stock 14" steel rims, the early 620 and early 720 hubs are the best since they'll fit the center hole of the rim. The later hubs have a larger nose diameter and will need to be ground or machined to fit the center hole. More info about the hubs is here: Hub Info
5 lug option. Once you have HB spindles, you can convert to 5 lug Toyota hubs. The info about that is here: 5 Lug Options
Alignment Info
I received this info from Mark Stein Innovations www.msimotorsports.com also on instagram.com/msinnovations/
For a “street car”, your optimum camber is going to be somewhere between -0.25 to -0.75, still giving good tire wear and good handling. As far as caster goes, for non-power steering, 3 to 4 degrees of positive caster works well. Don’t forget that because of road crown, you’ll want to run about a ½ degree more caster on the passenger side than the driver’s side to make the vehicle track straighter down the road. With this setup, you want about a ½-1 degree of negative camber at full compression.
For a “street car”, your optimum camber is going to be somewhere between -0.25 to -0.75, still giving good tire wear and good handling. As far as caster goes, for non-power steering, 3 to 4 degrees of positive caster works well. Don’t forget that because of road crown, you’ll want to run about a ½ degree more caster on the passenger side than the driver’s side to make the vehicle track straighter down the road. With this setup, you want about a ½-1 degree of negative camber at full compression.
Coil Over Info
This is just an example, based on what was used during the design.
Proshocks ASB series ASB/SR3AU(satin), ASB/SR3AUP(polished), 3" stroke, 8.5" compressed, 11.5" extended, 10.5" ride height, 7-8" tall springs.
COIL SPRING: Item #: 27300-1CR
Extreme Chrome Spring Coil-Over 2-5/8 Inch Inside Diameter 300 Lbs./Inch Rate 7 Inch Length
Proshocks ASB series ASB/SR3AU(satin), ASB/SR3AUP(polished), 3" stroke, 8.5" compressed, 11.5" extended, 10.5" ride height, 7-8" tall springs.
COIL SPRING: Item #: 27300-1CR
Extreme Chrome Spring Coil-Over 2-5/8 Inch Inside Diameter 300 Lbs./Inch Rate 7 Inch Length
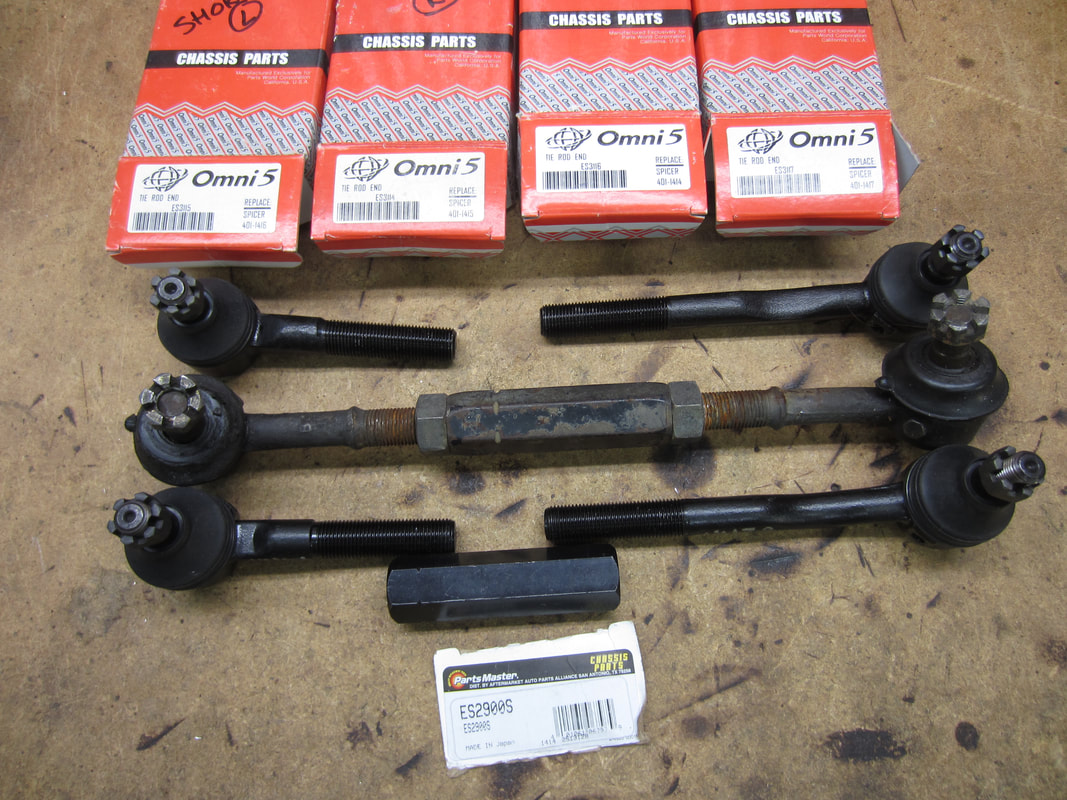
Tie Rod Assemblies
I had to refer to this info myself and realized, it's not very easy to see. There are five different part numbers. Four of them are the tie rod ends, the fifth is the barrel connector(turnbuckle). The "left" and "right" denote the thread direction, not the side of the vehicle. For the turnbuckle connector to work, it needs a left hand threaded tie rod on one end and a right hand threaded tied rod on the other. For example, a long, left tie rod needs to be used with a short right tie rod. For the turnbuckle to rotate in the same direction on the other side of the vehicle, it will need to have a long right paired with a short left.
Short, RH thread: ES3114 or Spicer 401-1415
Short, LH thread: ES3115 or Spicer 401-1416
Long, LH thread: ES3116 or Spicer 401-1414
Long, RH thread: ES3117 or Spicer 401-1417
Turnbuckle/coupler/connector: ES2900S
Short, RH thread: ES3114 or Spicer 401-1415
Short, LH thread: ES3115 or Spicer 401-1416
Long, LH thread: ES3116 or Spicer 401-1414
Long, RH thread: ES3117 or Spicer 401-1417
Turnbuckle/coupler/connector: ES2900S


LCA removal
I just came across this video on my YT channel and figure this would be a good place for it.
LCA Inner Bushing Info
If you're a glutten for punishment and really feel it's necessary to replace the LCA inner bushings, here's some vids for a bit more info.
I found a post I made on Ratsun.net that included links to IG posts I made. I'm going to put a link to the post here to make finding it again much easier.
https://ratsun.net/topic/75352-ball-joint-conversion/?do=findComment&comment=1695308
I'll paste the post here, but I'm not sure I'll do all the links. You can either go to the post with the above link or copy/paste them from below.
Posted January 31, 2021 (edited)This is everything that has been posted to IG already. I'll try to keep updating this as I go. Although, there is some consideration being given to completely getting off of social media...at least FB and IG.
Couple of notes. If you see dots at the bottom of the pic/video, that means there's more than one page. If so, there should be an arrow on the right side in the middle. Clicking the arrow moves you to the next pic/vid. Some have just one, others can have up to 10. For sound, there should be a black button at the bottom right with a speaker icon. It should be slashed out to start with, then when you click on it, the slash goes away and you'll get sound. I hope this works ok. I really don't have the time to mess with this much.
Cutting LCAs, starting
https://www.instagram.com/p/CI6KNG8Jr-u/?utm_source=ig_web_button_share_sheet
Still cutting LCAs, measuring
https://www.instagram.com/p/CI_epRBJWKq/?utm_source=ig_web_copy_link
Bandsaw cutting LCA
https://www.instagram.com/p/CJCnwU3Jff_/?utm_source=ig_web_copy_link
Marking sway bar hole
https://www.instagram.com/p/CJHRpz8JCbX/?utm_source=ig_web_copy_link
Machining sway bar hole
https://www.instagram.com/p/CJHSVhZJ7JM/?utm_source=ig_web_copy_link
Removing bottom plate with cnc mill and old cutter/endmill
https://www.instagram.com/p/CJMbtH2pLP4/?utm_source=ig_web_copy_link
Bottom plate, but with new cutter
https://www.instagram.com/p/CJWYPRcpgqg/?utm_source=ig_web_copy_link
Dealing with differences between parts from rockauto
https://www.instagram.com/p/CJhCvZNJhkq/?utm_source=ig_web_copy_link
3D print for UCA Xshaft test
https://www.instagram.com/p/CJwNAgApLLm/?utm_source=ig_web_copy_link
LCA bore for cup
https://www.instagram.com/p/CJwYnrppjuE/?utm_source=ig_web_copy_link
3d print finished, removing from bed
https://www.instagram.com/p/CJxVhyCpac-/?utm_source=ig_web_copy_link
3D print close up of hole and threading
https://www.instagram.com/p/CJzQ0l8Jvde/?utm_source=ig_web_copy_link
3D print on frame
https://www.instagram.com/p/CJzRNa9pK5w/?utm_source=ig_web_copy_link
More about LCA bore for cup
https://www.instagram.com/p/CJzfwKqJ8XQ/?utm_source=ig_web_copy_link
Even more about LCA bore
https://www.instagram.com/p/CJ1iqd7p0b-/?utm_source=ig_web_copy_link
3D print for lathe chuck depth stop to make the LCA cups
https://www.instagram.com/p/CJ3z0FGJp_A/?utm_source=ig_web_copy_link
Prepping stock for the cups
https://www.instagram.com/p/CKE70-hJWp7/?utm_source=ig_web_copy_link
Depth stop on lathe
https://www.instagram.com/p/CKFNdFnp9Kg/?utm_source=ig_web_copy_link
Cutting side one of the cups on the lathe
https://www.instagram.com/p/CKFPxiFpRR-/?utm_source=ig_web_copy_link
Start of mill work on cups.....oops
https://www.instagram.com/p/CKHqPnuJiPY/?utm_source=ig_web_copy_link
Cups being milled out
https://www.instagram.com/p/CKKM3E1poTN/?utm_source=ig_web_copy_link
Gusset prep for underside of LCAs
https://www.instagram.com/p/CKPSnJjJBQg/?utm_source=ig_web_copy_link
Over an hour of welding and barely half done on a set of arms (pic)
https://www.instagram.com/p/CKZuQ0FJ8TK/?utm_source=ig_web_copy_link
Laser cut parts for the LCAs
https://www.instagram.com/p/CKown86pk7h/?utm_source=ig_web_copy_link
Welding setup info
https://www.instagram.com/p/CKrbI_-JKsK/?utm_source=ig_web_copy_link
Couple of weld pics....nothing to write home about.
https://www.instagram.com/p/CKrrDSzpA2U/?utm_source=ig_web_copy_link
Look at coil over and shock
https://www.instagram.com/p/CK9oox4pQsl/?utm_source=ig_web_copy_link
Upper shock reinforcement
https://www.instagram.com/p/CLIN7N2p3gd/?utm_source=ig_web_copy_link